

So now I had tested out Marvelous Designer, it was time to actually try to create a optimal and realistic shirt which I could then export and import into Zbrush to add more detail.
Marvelous Designer
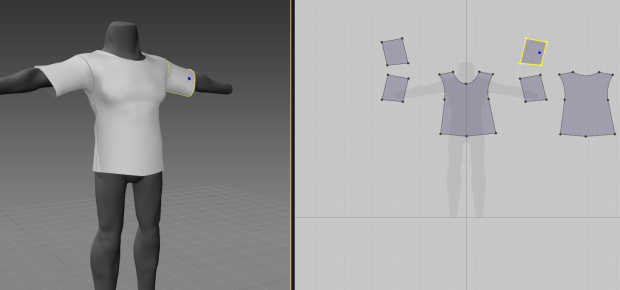
Fig 1: First T-Shirt
Fig 1 is the original shirt I had made featured in the first Marvelous Designer post and in that post I said I had to look at real shirts and patterns in order to create realistic clothing.
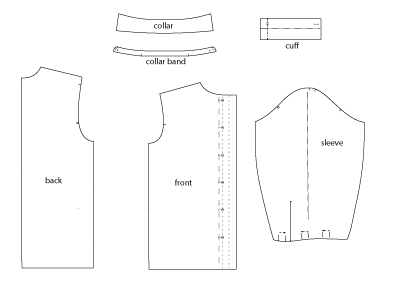
Fig 2: Shirt Sewing template
I found a decent shirt template online for a female top, which obviously wasn’t what I wanted but I knew I could work from it and make it suit what I needed.

Fig 3: Real shirt
In order to also get an idea of where the seams needed to be I decided to look at some real life reference which can be seen in Fig 3. The seams go from around the neck, down the shoulder but then the sleeve seam is actually under the arm, this is important to know for when I sew the shirt in Marvelous Designer.
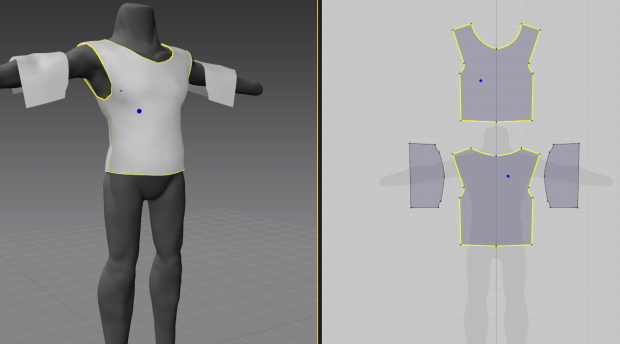
Fig 4: Initial Sewing
The new shirt pattern has a full sleeve rather that using two pieces and I also made the front and back pieces of the pattern one big pattern for each unlike the template I found which splits the back and front into two each.

Fig 5: Sleeve issues
When using Marvelous Designer, the shirt is attached together and sewn together in a real time simulation, this means that there are chances of it having some unwanted problems happen. I had an issue with the sleeves where the sleeve clipped through the body mesh therefore I had to move it in real time so that the actual sleeves would stay on properly.
I also accidentally sew the wrong seams together which caused backwards facing normals which is an issue since when it is exported into a 3D development software such as Zbrush it will become invisible unless the software is set to double sided. The problem with this is that some software do not allow double sided faces and it can cause some normal map creating issues.

Fig 6: Near Final Pattern
I had a perfectly working shirt at this point, I even added some sleeve rings that are at the end of most T shirts which help keep the shirt together and also helps to sturdy the sleeves.

Fig 7: Final Shirt Pattern
My final shirt pattern consisted of the main shirt front, back, sleeves but I also added a collar and a strip for the bottom of the shirt, the parts which are supposed to work as support are shown in orange in the 3D view as I have set them to be strengthened. You can also see in the 2D view where I have marked for stitching to be used (the dotted lines).
I made the shirt a little bigger in order to have some more hanging fabric to give a more realistic look instead of it being completely stuck to the body.
Importing to Zbrush

Fig 8: Zbrush Test
I exported the shirt as a OBJ file and then imported it into my Zbrush scene with the original body, little did I know that the seams created in Marvelous Designer would not actually carry over and instead would just leave the mesh as a whole object.
The mesh was also single sided which as I previously mentioned is bad for some software and so I decided to mask the entire model and then extrude out a new shape from the mask. This is the only way I know how to actually create a thick mesh from a flat mesh and it works perfectly and is a quick fix. Fig 8 shows the shirt once it was imported into Zbrush and then made thicker.
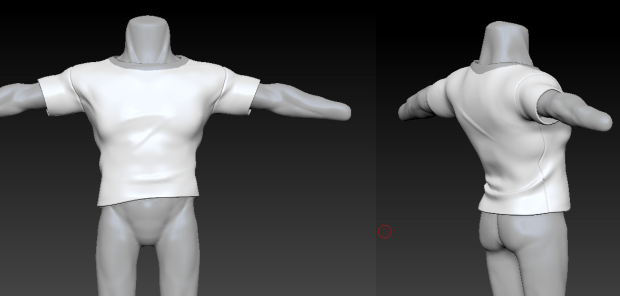
Fig 9: Redrawing Seams and Adding New Details
In order to get even more creases in the shirt, I had to manually sculpt them on inside of Zbrush, normally I would use the standard brushes, pinch brush and dam standard brush in order to get a neat realistic look but this time I went online to find some custom brushes that would make the task quicker.
I found 3 brushes from a website called selwy which were complete free to use and had examples of what they could do. The pack contained a strong crease brush, a lighter but wider crease brush and a custom pinch brush which focuses on pinching at an angle to make clothing indents.
In order to recreate the seams on the shirt, I manually used the dam standard tool which harshly cuts into the mesh which then gave these thin but strong seam lines. In order for this to work however, I needed to have the model at a high sub division or a high dynamesh setting since a great amount of polygons are needed to create smooth cuts.

Fig 10: My standard brushes of choice
References
Anon, [n.d]. Sewing Pattern Pieces [online]. Available at: https://angelakane.com/sewing_patterns/patterns/shirt-sewing-pattern-540.php [Accessed 25 April 2016].
Selwy, 2009. ZBrush Clothes Tutorial [online]. Available at: http://www.selwy.com/2009/zbrush-clothes-tutorial/ [Accessed 25 April 2016].
Tommy Hilfiger, [n.d]. Regular Fit T-shirt [online]. Available at: http://uk.tommy.com/Regular-Fit-T-shirt/0887894202,en_GB,pd.html?cgid=208010#!color%3D083%26size%3DSM [Accessed 25 April 2016].
